ROS Coding.2.Robot Model အား Keyboard မွတဆင့္ ခိုင္းေစနိုင္ရန္အတြက္ Node တစ္ခုဖန္တီးျခင္း
ကြ်န္ေတာ္တို႕ ROS Coding 1 မွာတုန္းက ဖန္တီးလာတဲ့ robot model ကို အျပင္က robot နဲ႕ ခ်ိတ္ဆက္ျပီး မခိုင္းေစခင္မွာ rviz ထဲမွာပဲ အရင္ move လုပ္ခိုင္းၾကည့္ပါမယ္။ ဒါမွ ကၽြန္ေတာ္တို႕ ဖန္တီးထားတဲ့ robot model သည္ မွန္ကန္စြာ သြားလား သို႕မဟုတ္ မွားေနလားဆိုတာကို သိနိုင္မွာ ျဖစ္ပါတယ္။ သူ႕ကို keyboard ကေန ခိုင္းေစနိုင္ဖို႕ရာအတြက္ ေအာက္ပါအတိုင္း program ကို သြားျပီး download လုပ္ပါမယ္။
sudo apt-get install ros-kinetic-teleop-twist-keyboard
သူ႕ကို run ရင္ေတာ့ ေအာက္ပါအတိုင္းပဲ run နုိင္ပါတယ္။
rosrun teleop_twist_keyboard teleop_twist_keyboard.py
run လိုက္ရင္ေတာ့ ေအာက္ပါအတိုင္း ဘယ္ key ကို နွိပ္ရင္ ဘယ္လို direction သြားမယ္ဆိုတဲ့ အညႊန္းကို ျပေပးေနမွာ ျဖစ္ပါတယ္။
Reading from the keyboard  and Publishing to Twist!
---------------------------
Moving around:
   u    i    o
   j    k    l
   m    ,    .

q/z : increase/decrease max speeds by 10%
w/x : increase/decrease only linear speed by 10%
e/c : increase/decrease only angular speed by 10%
anything else : stop

CTRL-C to quit
သူ႕ကို run တဲ့ အခ်ိန္မွာ ရွည္ရွည္လ်ားလ်ား command ေတြရိုက္ျပီး မ run ေတာ့ပဲ launch folder ထဲမွာ သူ႕အတြက္ teleop.launch ဖိုင္ေလး တစ္ခုသြားဖန္တီးထားပါမယ္။
<launch>
    <node name="teleop_twist_keyboard" pkg="teleop_twist_keyboard" type="teleop_twist_keyboard.py" output="screen"/>
</launch>
telex_twist_keyboard package ထဲက telex_twist_keyboard.py ဆိုတဲ့ program ေလးကို ေခၚ run လုိက္တာျဖစ္ပါတယ္။ ဒီေကာင္ကို run လိုက္ရင္ ဘာ result ေတြ ထြက္လာမလဲဆိုတာကို ၾကည့္လိုက္ရေအာင္။ terminal မွာ ေအာက္ပါ command ကို သြားျပီး run လုိက္ပါမယ္။
roslaunch myrobot1 teleop.launch
run ျပီးတာနဲ႕ ေနာက္ထပ္ terminal တစ္ခုကေန ဘယ္လို topic ေတြက output ေတြ ထုတ္ေပးေနတာလဲဆိုတာကို တစ္ခ်က္ၾကည့္ပါ့မယ္။
rostopic list
အထက္ပါ command ကို run လိုက္ပါက ေအာက္ပါပံုအတိုင္း ျပပါလိမ့္မယ္။

ဒီ topic ရဲ႕ information ကို တစ္ခ်က္ၾကည့္ၾကည့္ရေအာင္…
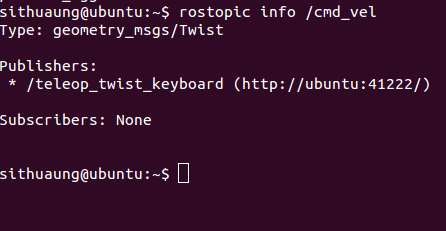
/cmd_vel ရဲ႕ message data type ဟာ geometry_msgs/Twist ျဖစ္ျပီး သူ႕ကို publish လုပ္ေနတဲ့ေကာင္သည္ /teleop_twist_keyboard ဆိုတဲ့ node ျဖစ္ေနပါတယ္။ ေလာေလာဆယ္မွာေတာ့ subscribe လုပ္တဲ့ေကာင္မရွိေသးဘူးေပါ့။ keyboard ကို နည္းနည္းနွိပ္ၾကည့္ျပီး /cmd_vel ကေန ဘယ္လိုေဒတာေတြထြက္လဲ ဆက္ၾကည့္ရေအာင္.
rostopic echo /cmd_vel
အထက္ပါ command နဲ႕ ၾကည့္လိုက္ရင္ေတာ့ ေအာက္ပါပံုအတိုင္းျပပါလိမ့္မယ္။
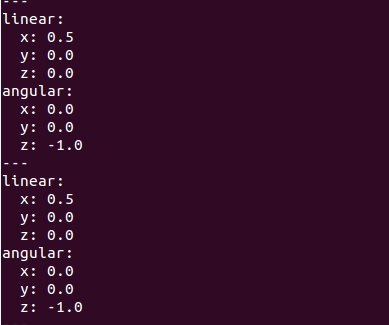
ဒီမွာ linear မွာ x နဲ႕ angular မွာ z ေဒတာေတြကို ထုတ္ေပးေနတာေတြ႕ရပါလိမ့္မယ္။ ဒီေတာ့ ဒီေဒတာေတြကို subscribe လုပ္ျပီး robot ကို ပို႕လိုက္တာနဲ႕ ကြ်န္ေတာ္တို႕ရဲ႕ robot model က အလုပ္လုပ္ျပီးျဖစ္ပါတယ္။ ဒီမွာ node ကို ေရးဖို႕ Theory ကို တစ္ခ်က္သြားျပန္ၾကည့္ပါမယ္။ ဒီလင့္မွာ mobile robot theory ကိုေရးခဲ့တာ ရွိပါတယ္။ mobile robot theory မွာတုန္းက ေအာက္ပါ equations ေတြ ဘယ္လိုရလာတယ္ဆိုတာကို ရွင္းျပခဲ့ပါတယ္.
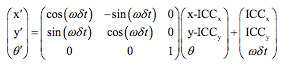
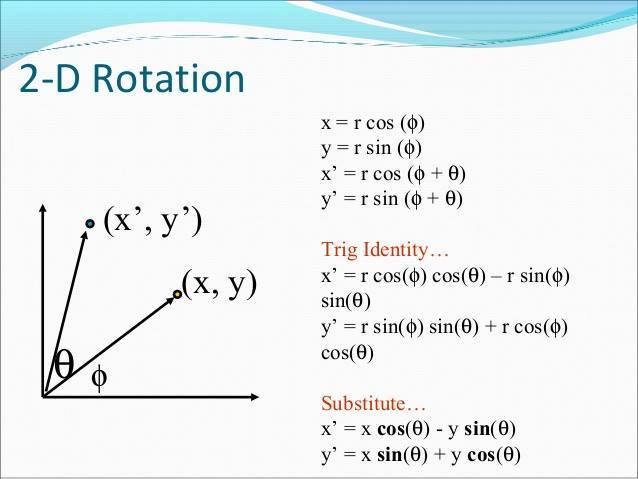
ဒီ equations ေတြမွာ ICCx နဲ႕ ICCy neglect လုပ္ထားလို႕ရပါတယ္။ အဲ့ဒီေတာ့ matrix ကို equation အတိုင္းျပန္ေ၇းနိုင္ပါတယ္။
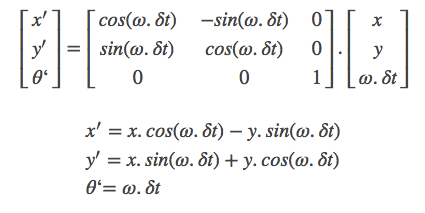
ဒီ x’, y’ နဲ႕ θ′ ကို program မွာ ဒီလိုေရးထားပါတယ္။ ROS ရဲ႕ library ေတြ ယူသံုးထားတာျဖစ္ျပီး ROS အေၾကာင္းကိုေတာ့ ကြ်န္ေတာ္ေရးထားတဲ့ post ေတြမွာ ဝင္ဖတ္နိုင္ပါတယ္။ myrobot1/src ဖိုင္ထဲမွာ myrobot1_odom.cpp ဆိုတဲ့ ဖိုင္ကို ဖန္တီးျပီးတာနဲ႕ ေအာက္ပါ code ေတြကို သြားကူးထည့္ဖို႕လိုပါတယ္။
#include <ros/ros.h>
#include <ros/time.h>
#include <tf/tf.h>
#include <tf/transform_broadcaster.h>
#include <geometry_msgs/Vector3.h>
#include <geometry_msgs/Twist.h>
#include <nav_msgs/Odometry.h>
float vx=0.0;
float vy=0.0;
float vth=0.0;
float x=0.0;
float y=0.0;
float th=0.0;

void vel_callback(const geometry_msgs::Twist& vel)
{
     vx=float(vel.linear.x);
     vy=float(vel.linear.y);
     vth=float(vel.angular.z);
}

int main(int argc,char** argv)
{
     ros::init(argc,argv,"myrobot1_odom");
     ros::NodeHandle n;
     ros::Subscriber sub=n.subscribe("cmd_vel",50,vel_callback);
     ros::Publisher odom_publisher=n.advertise<nav_msgs::Odometry>("odom",50);
     tf::TransformBroadcaster odom_broadcaster;
     ros::Time current_time,last_time;
     current_time=ros::Time::now();
     ros::Rate r(10);
     while(n.ok())
     {
          ros::spinOnce();
          current_time=ros::Time::now();
          float dt=(current_time-last_time).toSec();
          float delta_x=(vx*cos(th)-vy*sin(th))*dt;
          float delta_y=(vx*sin(th)+vy*cos(th))*dt;
          float delta_th=vth*dt;
          x+=delta_x;
          y+=delta_y;
          th+=delta_th;
          geometry_msgs::Quaternion odom_quat=tf::createQuaternionMsgFromYaw(th);
          geometry_msgs::TransformStamped odom_trans;
          odom_trans.header.stamp=current_time;
          odom_trans.header.frame_id="odom"း
          odom_trans.child_frame_id="base_link";
          odom_trans.transform.translation.x=x;
          odom_trans.transform.translation.y=y;
          odom_trans.transform.translation.z=0.0;
          odom_trans.transform.rotation=odom_quat;
          odom_broadcaster.sendTransform(odom_trans);
          nav_msgs::Odometry odom;
          odom.header.stamp=current_time;
          odom.header.frame_id="odom";
          odom.pose.pose.position.x=x;
          odom.pose.pose.position.y=y;
          odom.pose.pose.position.z=0.0;
          odom.pose.pose.orientation=odom_quat;
          odom.child_frame_id="base_link";
          odom.twist.twist.linear.x=vx;
          odom.twist.twist.linear.y=vy;
          odom.twist.twist.angular.z=vth;
          odom_publisher.publish(odom);
          last_time=current_time;
          r.sleep();
     }
}
ဒီမွာ cmd_vel ဆိုျပီး microcontroller ဆီကေန ေဒတာကို ယူထားပါတယ္။ ဒီမွာေတာ့ ကြ်န္ေတာ္တို႕ အလိုရွိတဲ့ linear velocity vx, linear velocity နဲ႕ angular velocity vth တို႕ပါဝင္လာမွာ ျဖစ္ပါတယ္။ vx, vy နဲ႕ vth တို႕ကိုေတာ့ ကၽြန္ေတာ္တို႕ရဲ႕ equationမွာ ေအာက္ပါအတိုင္း ထည့္တြက္ထားပါတယ္။
float delta_x=(vx*cos(th)-vy*sin(th))*dt;
float delta_y=(vx*sin(th)+vy*cos(th))*dt;
float delta_th=vth*dt;
x+=delta_x;
y+=delta_y;
th+=delta_th;
ရလာတဲ့ x, y, theta တို႕ကို အသံုးျပဳျပီး reference frame နဲ႕ ကၽြန္ေတာ္တို႕႕ရဲ႕ robot frame ျဖစ္တဲ့ odometry ကို translation ျပဳလုပ္ျပီး အျမဲျပသထားပါတယ္။
geometry_msgs::TransformStamped odom_trans;
odom_trans.header.stamp=current_time;
odom_trans.header.frame_id="odom";
odom_trans.child_frame_id="base_link";

odom_trans.transform.translation.x=x;
odom_trans.transform.translation.y=y;
odom_trans.transform.translation.z=0.0;
odom_trans.transform.rotation=odom_quat;
odom_broadcaster.sendTransform(odom_trans);
က်န္တဲ့ code ေတြကေတာ့ robot frame လက္ရွိေရာက္ေနတဲ့ position ေနရာနဲ႕ သူ႕ရဲ႕ velocity ကို အျမဲ update လုပ္ထားတာပဲ ျဖစ္ပါတယ္။ ကူးထည့္ျပီးတာနဲ႕ CMakeLists.txt ထဲမွာ ေအာက္ပါ စာသားနွစ္ေၾကာင္းကို ကူးထည့္ျပီးတာနဲ႕ compile လုပ္လိုက္ပါမယ္။
add_executable(myrobot1_odom src/myrobot1_odom.cpp)
target_link_libraries(myrobot1_odom ${catkin_LIBRARIES})
ဒီ program ကိုပဲ python မွာ ဒီလိုေရးနိုင္ပါတယ္။ myrobot1/scripts ဆိုတဲ့ folder ထဲမွာ myrobot1.py ဆိုတာကုိ ဖန္တီးျပီး ေအာက္ပါ code ေတြကို ကူးထည့္ပါ့မယ္။
#!/usr/bin/env python

import rospy
import tf
from nav_msgs.msg import Odometry
from geometry_msgs.msg import Point, Pose, Quaternion, Twist, Vector3, TransformStamped

import math
from math import sin, cos, pi

class odomPub():
    def __init__(self):
        self.x=0.0
        self.y=0.0
        self.th=0.0
        self.vx=0.0
        self.vy=0.0
        self.vth=0.0
        rospy.init_node('myrobot1_odom',anonymous=True)
        self.sub=rospy.Subscriber('cmd_vel',Twist,self.callback)
        self.odom_publisher    =rospy.Publisher('odom',Odometry,queue_size=50)
        self.odom_broadcaster=tf.TransformBroadcaster()


        current_time=rospy.Time.now()
        last_time    =rospy.Time.now()

        rate=10
        r=rospy.Rate(rate)

        while not rospy.is_shutdown():
            current_time=rospy.Time.now()
            dt=(current_time - last_time).to_sec()
            delta_x=(self.vx * cos(self.th) - self.vy * sin(self.th)) * dt
            delta_y=(self.vx * sin(self.th) + self.vy * cos(self.th)) * dt
            delta_th=self.vth * dt

            self.x += delta_x
            self.y += delta_y
            self.th+= delta_th

            odom_quat=tf.transformations.quaternion_from_euler(0,0,self.th)

            self.odom_broadcaster.sendTransform(
                (self.x , self.y, 0.),
                odom_quat,
                current_time,
                "base_link",
                "odom"
            )

            odom=Odometry()
            odom.header.stamp=current_time
            odom.header.frame_id="odom"

            #set the position
            odom.pose.pose=Pose(Point(self.x, self.y, 0.0), Quaternion(*odom_quat))

            #set the velocity
            odom.child_frame_id="base_link"
            odom.twist.twist=Twist(Vector3(self.vx, self.vy, 0.0), Vector3(0, 0, self.vth))

            #publish the message
            self.odom_publisher.publish(odom)

            last_time=current_time
            r.sleep()

    def callback(self,data):
        self.vx=data.linear.x
        self.vy=data.linear.y
        self.vth=data.angular.z


if __name__=='__main__':
    try:
        odomPub()
    except rospy.ROSInterruptException:
        pass
ကူးထည့္ျပီးတာနဲ႕ ေအာက္ပါ command ေတြနဲ႕ executable ဖိုင္ကို ဖန္တီးလိုက္ပါမယ္။
roscd myrobot1/scripts
chmod +x myrobot1.py
အားလံုးျပီးရင္ေတာ့ myrobot1/launch ထဲမွာရွိတဲ့ display.launch ကို ေအာက္ပါအတုိင္း သြားျပင္ထားပါမယ္။
<?xml version="1.0"?>
<launch>
     <arg name="model" default="$(find myrobot1)/urdf/myrobot1.urdf"/>
     <arg name="gui" default="False"/>

     <param name="robot_description" textfile="$(arg model)"/>
     <param name="use_gui" value="$(arg gui)"/>

     <node name="joint_state_publisher" pkg="joint_state_publisher" type="joint_state_publisher"/>
     <node name="robot_state_publisher" pkg="robot_state_publisher" type="state_publisher"/>
     <node name="rviz" pkg="rviz" type="rviz" args="-d $(find myrobot1)/rviz/myrobot1.rviz"/>
     <node name="myrobot1_odom" pkg="myrobot1" type="myrobot1_odom.py" output="screen"/>
</launch>
node name မွာေတာ့ ဖိုင္နဲ႕ အတူတူပဲ myrobot1_odom လို႕ ေပးထားပါတယ္။ myrobot1_odom.py ထဲမွာလည္း node ကို myrobot1_odom လို႕ပဲ initialize လုပ္ခဲ့တာနဲ႕ အတူတူပဲ ျဖစ္သြားပါလိမ့္မယ္။ pkg ကေတာ့ myrobot1 ဆိုတဲ့ package ထဲမွာပဲ ရွိမွာေပါ့။ type မွာေတာ့ myrobot1_0d0m.py ကို သံုးထားတယ္။ မိတ္ေဆြတို႕က cpp နဲ႕ေရးလို႕ထြက္လာတဲ့ excutable ဖုိင္ကို သံုးခ်င္တယ္ဆိုရင္ေတာ့ type မွာ myrobot_odom လို႕ေရးလိုက္ရင္ရပါျပီ။
အားလံုးျပီးသြားရင္ေတာ့ terminal တစ္ခုမွာ ေအာက္ပါ command အတိုင္း run လုိက္တာနဲ႕ robot ကို ျမင္ရမွာ ျဖစ္ပါတယ္။
roslaunch myrobot1 display.launch
ေနာက္ terminal တစ္ခုမွာေတာ့
roslaunch myrobot1 teleop.launch
လုိ႕ run ျပီးတာနဲ႕ စမ္းသပ္လို႕ရျပီ ျဖစ္ပါတယ္။